
Choosing a torch style
Torches change how a yard feels after dark. You aren't stuck with just one look; options range from temporary bamboo poles to permanent stone basins. The right choice depends on whether you want a temporary party setup or a permanent fixture.
Traditional tiki torches, with their bamboo construction and Polynesian flair, evoke a tropical, laid-back feel. They’re great for luaus or just creating a casual, beachy atmosphere. Modern fire bowls, usually made from metal or stone, offer a more contemporary look. They’re often larger and can serve as a focal point for your outdoor space.
Wall-mounted torches are a fantastic option if you’re short on space or want a more permanent lighting solution. These can range from rustic iron designs to sleek, minimalist styles. Consider how the torch style complements your existing patio furniture and landscaping. A sleek fire bowl might look out of place with a very rustic, wooden deck, for example.
Don't underestimate the power of grouping! Several smaller torches can create a more intimate setting than one large one. Think about layering light – combining different torch styles, along with string lights or lanterns, can add depth and visual interest to your backyard.
Fuel types and performance
Choosing the right fuel is just as important as the torch itself. It affects burn time, scent, and even how well it repels insects. Citronella oil is the most commonly known, and it’s marketed heavily for its mosquito-repelling properties. Honestly, I’m a little skeptical about how effective it truly is – I've found I still need a separate insect repellent, even with citronella burning.
Paraffin-based fuels are another popular choice. They tend to burn cleaner and brighter than citronella, but they don’t offer the same insect-repelling benefits. You can find paraffin fuels with added fragrances, which can be a nice touch. I've had good luck with fuels scented with lavender or rosemary, which also seem to deter some bugs.
Bio-ethanol is a renewable option that burns without much smoke. It costs more than paraffin and requires a specific burner. The flame is usually shorter and harder to see in daylight, which is a fair trade-off if you hate soot.
Consider your priorities when choosing a fuel. If bug control is your main concern, try a combination of citronella and a separate repellent. If you want a clean, long-lasting burn, paraffin or bio-ethanol might be better choices. Experiment to find what works best for your needs and preferences.
Where to place your torches
Let's be blunt: fire is beautiful, but it's also potentially dangerous. Proper site selection is absolutely critical when installing patio torches. The first rule is distance. Keep torches at least 10 feet away from any structures, including your house, shed, fence, or deck railings. More distance is always better.
Pay close attention to overhead hazards. Avoid placing torches under low-hanging branches, eaves, or anything else that could catch fire. Even dry leaves can be a risk! Wind is another major factor. Choose a location that's sheltered from strong gusts, or use a wind guard around the torch. A strong wind can easily tip over a torch or blow the flame towards flammable materials.
Ensure the surface where you place your torch is level and stable. Uneven ground can cause the torch to wobble and potentially fall over. For freestanding torches, a solid base is essential. We’ll cover building a proper base in the next section. Don't place torches on wooden decks or near dry grass – these are obvious fire hazards.
Finally, always have a fire extinguisher or a bucket of water nearby in case of emergencies. And never leave a burning torch unattended. Fire safety isn't something to compromise on; it’s about protecting your home and your loved ones.
- Maintain a 10ft distance from structures.
- Avoid overhead hazards like branches.
- Shelter from strong winds.
- Ensure a level and stable surface.
- Keep a fire extinguisher nearby.
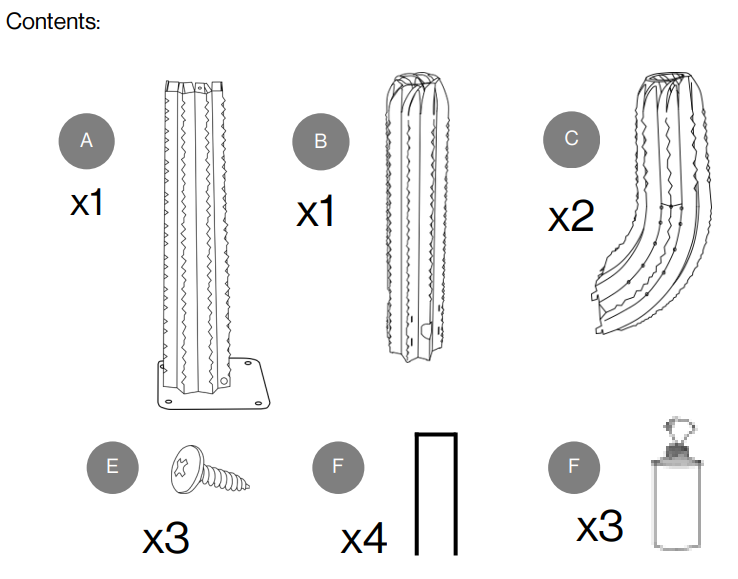
Building a stable base
A wobbly torch is a fire hazard. You can build a stable base using 2-inch PVC pipe. The goal is to create a weighted sleeve that keeps the pole upright even if the ground shifts or someone bumps it.
You'll need a length of 2” PVC pipe, a PVC end cap, some gravel or sand for weight, and a way to secure the torch to the pipe. The video suggests cutting the PVC pipe to your desired height and then filling it with gravel or sand. The end cap prevents the weight from spilling out. Then, you can either drill a hole in the PVC to insert the torch post or use a mounting bracket.
While PVC is affordable and easy to work with, it doesn't exactly scream “stylish.” Consider using more aesthetically pleasing materials for your base, such as concrete, stone, or even a repurposed metal bucket. You can also decorate the PVC pipe with paint, rope, or other materials to blend it in with your outdoor décor.
When building your base, prioritize weight and stability. The heavier the base, the less likely the torch is to tip over. Make sure the torch post is securely attached to the base to prevent it from shifting or falling. A little extra effort in building a solid base will give you peace of mind and ensure a safer outdoor experience.
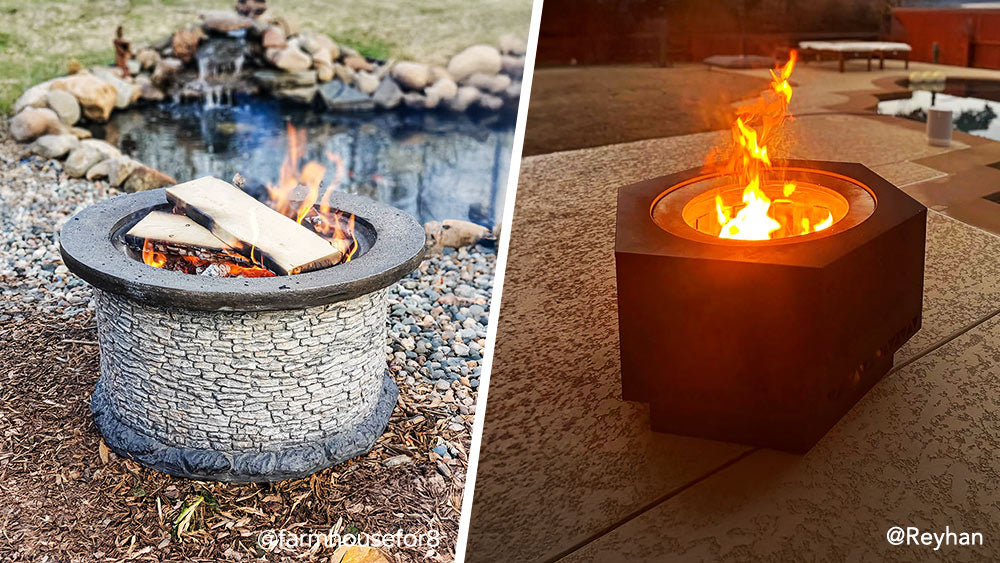
Installing a fire bowl
Installing a fire bowl is a bit more involved than setting up a freestanding torch, but the results are well worth the effort. The first step is digging a pit. The depth of the pit will depend on the size of your fire bowl, but generally, 6-12 inches is a good starting point. Make sure the pit is wider than the fire bowl to allow for a surrounding buffer zone.
Proper drainage is essential. You don't want water accumulating in the pit, which can cause rust or make it difficult to light the fire. Add a layer of gravel or crushed stone to the bottom of the pit to improve drainage. This also helps to create a stable base for the fire bowl.
The surrounding material is also important. Gravel, stone, or sand are all good choices. Avoid using flammable materials like wood chips or mulch. Consider creating a fire ring around the fire bowl using stones or bricks. This adds a visual element and provides an extra layer of safety.
I’m curious if anyone has experimented with using recycled materials for the fire ring – perhaps old bricks or pavers? It could be a great way to add a unique touch to your backyard while also being environmentally friendly. Regardless of the materials you choose, ensure they are non-combustible and can withstand high temperatures.
Fixing common problems
Even with careful planning, you might encounter some issues with your patio torches. Flickering flames are a common problem, often caused by a low fuel level or a draft. Make sure the torch is adequately filled with fuel and sheltered from the wind. Sometimes, a simple adjustment of the wick can also help.
Fuel leaks can be a sign of a damaged wick or a faulty torch. Inspect the wick for cracks or tears and replace it if necessary. If the leak persists, the torch itself may be damaged and should be replaced. Never attempt to repair a leaking torch yourself – it's a fire hazard.
Torches blowing over are usually caused by an unstable base or strong winds. Ensure the base is weighted and stable, and consider using a wind guard. Difficulty lighting can be due to a wet wick or low fuel. Dry the wick thoroughly and refill the torch with fresh fuel.
I’ve personally struggled with getting a consistent flame sometimes, especially after the torch has been sitting unused for a while. What I’ve found is that gently priming the wick with a small amount of fuel before lighting it helps to get it going. It’s a small trick, but it can make a big difference.
Cleaning and storage
Torches, like any outdoor equipment, require regular maintenance to stay in good condition. After each use, allow the torch to cool completely before cleaning it. Remove any debris or soot from the wick and the torch housing. A soft brush or a damp cloth is usually sufficient.
Proper storage during the off-season is crucial. Empty the torch of fuel and store it in a dry, sheltered location. Protect it from the elements to prevent rust and corrosion. Consider covering it with a tarp or storing it indoors. Inspect the torch for any signs of wear and tear before storing it.
Regularly inspect the wick for damage and replace it if necessary. Check the base for stability and repair any cracks or damage. With proper maintenance, your torches will last for years and continue to provide a warm and inviting glow.
I think people often underestimate the amount of maintenance torches need. A little bit of care goes a long way in extending their lifespan and ensuring safe operation. Don’t just toss them in the shed and forget about them – give them the attention they deserve.
Torch Style Decision Matrix
| Traditional Tiki | Modern Fire Bowl | Wall-Mounted |
|---|---|---|
| Aesthetic | Rustic, tropical 🌴. Creates a classic, relaxed vibe. | Sleek, contemporary. Often minimalist and can be a statement piece. |
| Bug Repellency | Effective with citronella oil. Smoke helps deter insects. | Moderate, depending on fuel source and airflow. May require additional bug control. |
| Ease of Installation | Generally simple – often just staking into the ground. Some may require minor assembly. | Can range from simple placement to more involved setup with gas lines or electrical connections. |
| Maintenance | Regular refilling with fuel and wick trimming. Occasional cleaning. | Cleaning the bowl, maintaining fuel source (wood, propane, etc.). |
| Cost | Typically the most affordable option. Prices vary based on material and size. | Can range widely, from moderately priced to quite expensive depending on materials and features. |
Illustrative comparison based on the article research brief. Verify current pricing, limits, and product details in the official docs before relying on it.


No comments yet. Be the first to share your thoughts!